by Dan Kratzer
Retired Coach and Consultant for Missouri Valley College
Effective use of the quick game will spread the defense and make them adjust to last second match-ups.
After spending two training camps with Hall of Fame coach Bill Walsh with the Cincinnati Bengals as my receivers coach, and two more training camps with Hall of Famer Hank Stram and the Kansas City Chiefs, I embarked on my coaching and teaching career during the 1974 season by helping out at my alma mater Missouri Valley College.
During my 37 years of coaching, I spent seven in high school and 30 years in college at every level. I was fortunate to be invited to the 49’ers training camp when Coach Walsh was coaching and spent two weeks as an administrative assistant, sitting in on all offensive meetings. All my experience had lead me to where I am today, writing technical articles that hopefully will enhance someone’s playbook. I have broken down the passing game over the years into 10 different technical strategies or concepts. The articles show the technical aspect of play and the strategies involved with the QB, receivers, backs, and the offensive linemen, and when to attack different areas and different defenses. This is the first of a series of articles on the quick game.
The quick game, like every other strategy in passing, is based on the most essential aspect of the passing game – timing. All primary routes will need to be timed up with the drop of the QB. His feet and his steps during disengagement are vitally important aspects to the success of this concept. Usually your trigger guy or QB will dictate the kind of strategies or concepts that best fit your package. His ability to move and release the ball quickly with precise timing to the receiver will also help determine your passing strategy from year to year.
QUICK GAME PHILOSOPHY
You must first develop a philosophy behind each aspect of the passing game. In the quick game, we want to accomplish 6 basic things:
1. Quick easy completions.
2. Precise timing with the center, QB, and WRs.
3. Precise route running with first option.
4. Quick snaps with the center/QB exchange.
5. Built in hot routes.
6. Built in big plays to keep safeties honest.
To make sure we could accomplish these 6 basics, we had to put our receivers in the best possible positions to get each pass completed. We accomplished this by establishing 3 different tactics:
1. Spread the defense to develop exact match-ups.
2. Squeeze the defense to be able to attack the flats.
3. Quick shifts and quick motions as well as stacked receivers to make the defense adjust to last minute match-ups.
For some plays we may just use one tactic, while others may require more than one. Each play is designed to be used with multiple tactics if necessary, depending on the defense. The quarterback and receivers always assume man coverage until they recognize zone.
Diagrams 1-A, 1-B, and 1-C will show the same play against three different coverages with route adjustments changing when necessary.
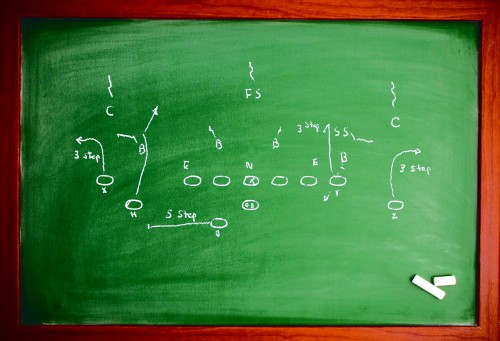
Diagram 1-A: The Quick Out (Owl) vs. Cover 3
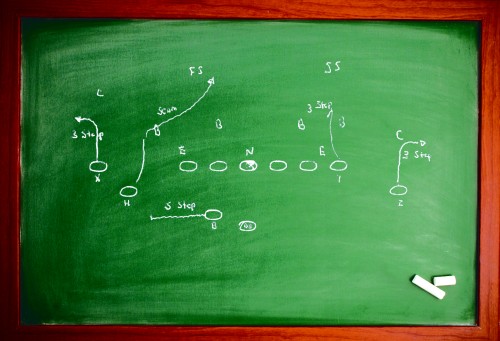
Diagram 1-B: The Quick Out (Owl) vs. Soft Cover 2 or Cover 4
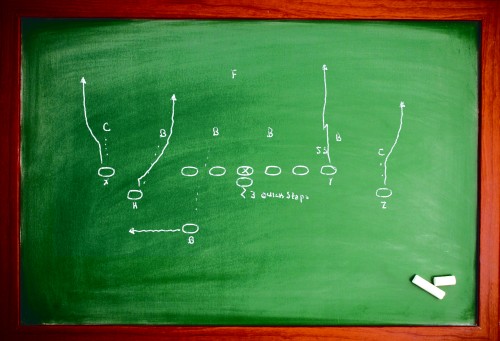
Diagram 1-C: the Quick Out (Owl) vs. Press Man Coverage
ABOUT THE PLAY
The play is designed as a vertical stretch route to time up against soft corners. It works best when you have soft corners in cover 3 or cover 4. Soft corners in either coverage will be the first indicator of where to go with the ball. The QB will go to his #1 option which is the quick out. If both corners are pressing, the second indicator will be to check the safeties. One safety will indicate a strong safety is down to the strong side so the QB will look to the #2 option to the weak side or quick side. If we get a two safety look, we will go to the #2 option to the field or the strong side because the linebacker to that side is usually a better run support player than a cover player. The third option in the QB’s progression will be the shoot route to the back. If the QB gets a no safety look, or both safeties indicate they are in man coverage, we will give the QB the option to go to the quick seam route or the built in ‘Big Play’ receiver. This gives us a real threat when teams start to press to stop the short quick game. Versus the zone read, #1 to #2, outside to #3 is the outlet behind the LOS, no matter which side you read 1-2-3.
THE RECEIVER ROUTES
X and Z – Quick out is a three-step route with no plant and a cut run at the corner to get to 5-7 yards depth. Both will convert to fade if pressed. They should reduce splits for plenty of room for this route.
H – Quick seam – he will always look off the line of scrimmage; that is, uncovered or hot vs. man press. He then becomes the primary WR.
Y – Hitch – He will always run a 3-step hitch. He stops and pivots open to the inside to get body position on the defender. If pressed, he will turn into a hitch and go. He should stay to his side of field away from H’s route.
Back – Shoot route (or line) will always be an outlet. He runs five lateral steps and stops, waiting for the ball. He should look and turn to the QB.
THE OFFENSIVE LINE
Center – If covered aggressively, hold ground and stay low. If uncovered, slide away from backs alignment area.
Strong Guard – If covered aggressively, hold ground and stay low. If uncovered, slide away from backs alignment area.
Quick Guard – If covered, aggressively hold ground and stay low. If uncovered, slide away from backs alignment area.
Strong Tackle – If covered aggressively, cut defender and stay low. If uncovered, look for man outside, or first man to threaten primary throwing lane and aggressively cut him. If no one is outside, stay and slide away from back alignment area.
Quick Tackle – If covered aggressively, cut defender staying low. If uncovered, slide and cut first man to threaten primary throwing lane.
THE QUARTERBACK
Pre-snap, the QB will read the corners. If a soft corner to the quick side, go to quick out to X with progression continuing on the weak side. If a soft corner strong, go to a quick out to Z with progression continuing to the strong side. If both corners are pressing, you have a mismatch and can go to a fade adjustment. If no mismatch, read progression #2 to #3 to either side based on the play. If there is one free safety, the progression is Y to the back. If no free safety, go H to back. The actual drop will depend on whether the QB is under center, in the pistol or in the gun.
THE BLITZ
We always have built in HOT reads, even in the quick game when normally a blitz cannot get to the QB in time. We don’t worry about the blitz because of the quick release of the QB. We are well protected inside, but blitzes will alert H, Y and B that they are automatically hot in the quick game when needed.
GAME PLAN
Each game we will have three different ways to run each pass pattern.These adjustments will vary from game to game or from defensive alignment based on each opponents’ coverage tendencies (Diagrams 2A, 2B, and 2C).
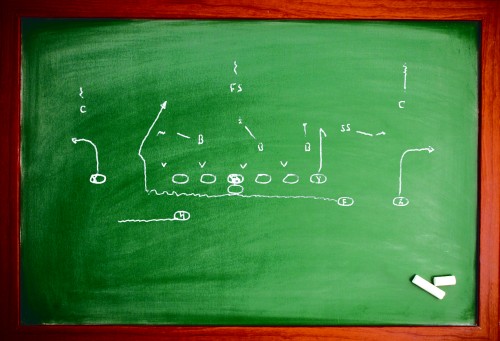
Diagram 2A: Vs. Cover 3
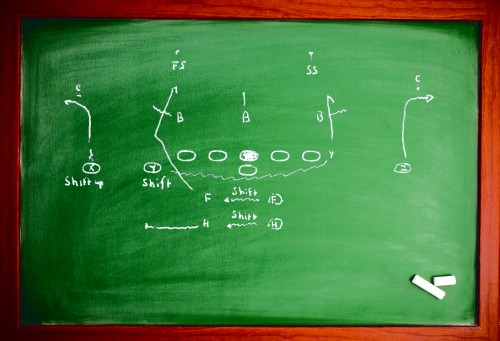
Diagram 2B: Vs. Cover 2
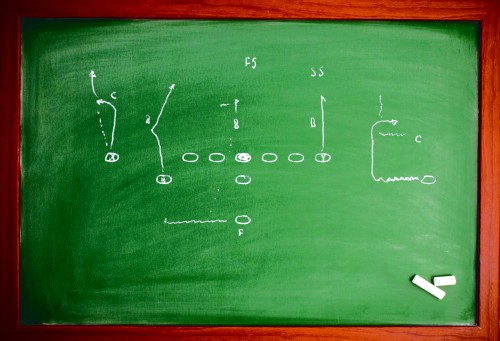
Diagram 2C: Vs. Press Man Coverage
WHEN AND WHERE
We like our quick game and this play on first and second downs and medium to long (5-10 yards). We can go under center or we can go pistol or shotgun. The quarterback’s release time will dictate which we decide to do from year to year.
We also like this play with the quick side to the boundary, unless we get a team that will roll the strong safety to the boundary based on our strength. We also like to put the formation in to the sideline when we get a team that will run a lot of cover 4 zone, or loose man coverage. This gives us a great opportunity to throw one-on-one to our top receiver with a lot of room for him. One missed tackle can result in a big play.
THE PLAY
The Hitch (Hank) – Diagrams 3 and 4
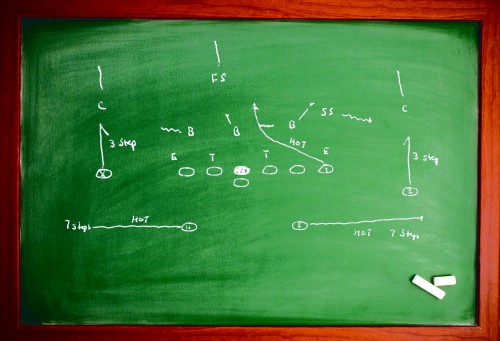
Diagram 3: “Hank” vs. Cover 3
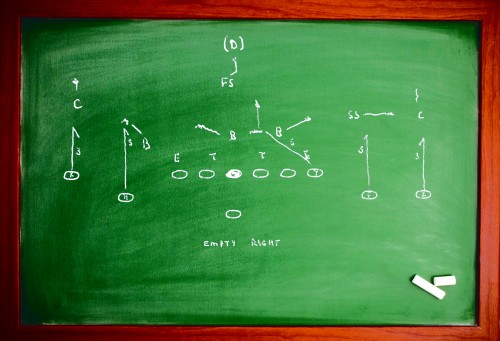
Diagram 4: “Empty Hank” vs. Cover 3
This is another play that is good vs. soft cover 3 zone teams or soft cover 4 zone teams. It is also effective against a loose man coverage team. Usually we will run the strong side to the field, but against a cover 4, it may be more advantageous to go to the quick side of the field in order to get a one-on-one match-up. Again, one missed tackle in this situation will result in a big play. This is designed as a three-step drop from under center, a one-step drop from the Pistol, and a hip turn and throw from the Gun.
THE RECEIVER ROUTES
X and Z – 3-step routes and open up to the quarterback. Be ready to slide away from the closest defender. Be also prepared to catch the ball quickly. Squeeze your split from normal to two yards inside normal. This helps decrease the time the ball is in the air and allows shoot routes by backs to outflank the widest defender covering X and Z.
Y – Step angle hitch – Y may be a hot receiver if there is an inside blitz to his side of the center. If there is a middle safety, set down on five steps and look to the quarterback. If there is no middle safety, continue upfield after the fifth step and run the seam looking for the ball. H and B will run a seven-step route. Stop after the seventh step. Throttle down on the fifth step, planting the outside foot and pivoting to the QB. Wait as an outlet to catch the ball and turn shoulders upfield when receiving the ball.
About the Author: Dan Kratzer retired after the 2011 season as head coach at the South Dakota School of Mines. He coached for 37 years, seven at the high school level and 30 on the college level. Kratzer also coached at Ohio Northern, Lindenwood and Indiana. He currently works as a consultant at his alma mater, Missouri Valley College.