by Sean Lucas
Quarterback Coach, Providence Catholic High School (IL)
The “Shallow Cross” is a concept that can help your offense remain simple to your players, keep defensive coordinators scratching their heads by running it out of various formations and attack blitz happy teams that are trying to keep you in long yardage situations. We begin each summer teaching the “Shallow Cross” from a 2×2 set in order to present the rules for the play as basic as possible. After our players grasp the WR rules from a 2×2 set, we will then present the play from a 3×1 set, a 2×1 set and then incorporate motions to add deception for the defense. Although the “Shallow Cross” play works very well against multiple coverages such as two-man, two-zone and quarters, in order to remain consistent in this article we will draw up all routes with a closed middle, Cover 1 or Cover 3 look.
Shallow Cross from a 2×2 Set (Diagram1/Diagram 2, page 3)
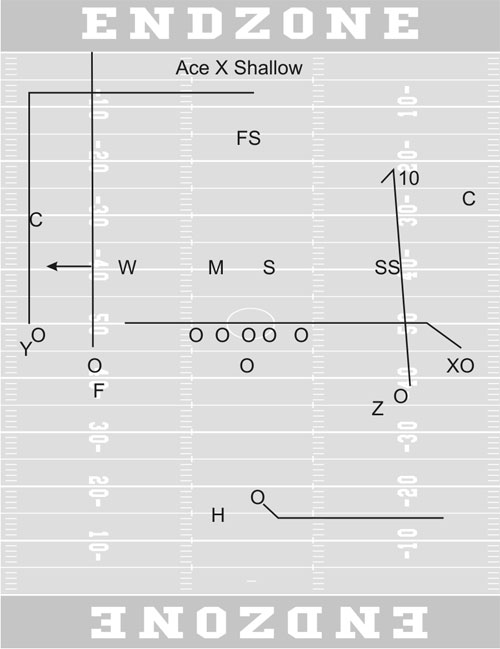
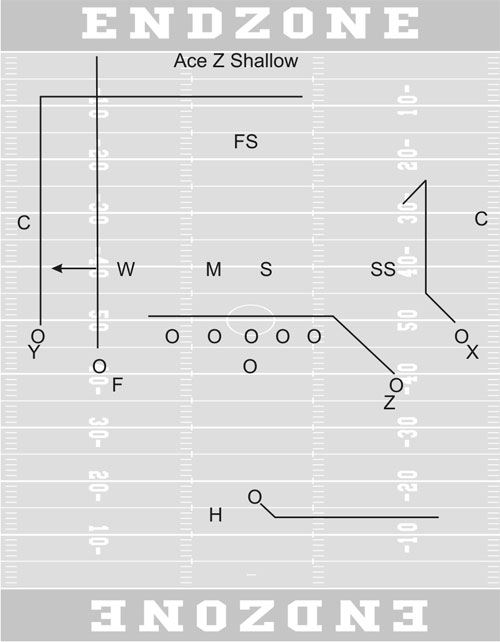
The rules that we present to our players in the beginning of the summer for each receiver are as follows:
Rule#1 – The tagged WR must run the Shallow Cross route on the pre-snap heels of the defensive linemen looking for the ball immediately (our QB will throw the Shallow 7/10 times we run this play).
Rule#2 – The non-tagged WR inside the called Shallow Cross must run a twelve yard curl (Diagram 1); if the non-tagged WR is to the outside of the tagged Shallow Cross, then he must run a ten yard Square In (Diagram 2). In either case, the non-tagged WR must find green grass between the SS and the Sam LB and open to the ball.
Rule #3 – The single back must swing to the WR running the Shallow Cross route, eyeballing the defender covering the WR running the Shallow to determine man or zone coverage.
Rule #4 – If you are the furthest WR from the Shallow Cross tag, then you must run a Dig at fifteen yards.
Rule #5 – The inside WR, to the opposite side of the Shallow Cross, runs a Streak looking to occupy the FS and take him out of the play.
Blitz Control
When releasing five receivers into a route, blitz control becomes an important issue. In order to control the blitz off the edge versus a 4-4, we have two “hot” throws built into the play. Our “hot” to the Shallow Cross side will be the HB swing. Pre-snap and post-snap, our HB will eyeball the defender covering the Shallow Cross and read his movement. If the defender covering the Shallow Cross blitzes, or runs with the WR he is capping, then the HB makes his “Hot, Hot, Hot” call and could receive the ball if it is not thrown to the Shallow Cross (our QB will throw the Shallow 7/10 times we run this play). The HB will have either the Sam LB or FS in one-on-one coverage, a match-up we will take every time. Our back-side “Hot” is run by the inside WR opposite the Shallow Cross. Should the Will LB begin to walk in off the edge, or blitz post-snap, then the back-side number two WR must sight adjust his Streak route, run a two-step Out route and should expect the ball. Without going into pass protection in great detail, if Mac were to blitz, we should be protected. If Sam should blitz, or Sam and Mac blitz, then the QB will think Shallow Cross route first and listen for his “Hot” call from the HB running the Swing second.
QB Read
Pre-Snap Reads
1. Read open or closed safeties and look for cues from the Safeties or Corners, which may tip man or zone.
2. Check the edge of both sides of the line of scrimmage for blitz. If the FS caps one of our WR’s and we see a walker, then the QB must attack the blitz by throwing the Shallow Cross, Quick Out, or the Swing.
Post-Snap Reads vs. Zone
1. Read defender covering the Shallow Cross to determine man or zone coverage.
2. Read drops by Sam and Mac to determine the throw. If Sam and Mac drop to curl areas, then throw the Shallow Cross. If Sam squeezes the Shallow Cross, then throw the Curl/Square In.
3. If Mac squeezes the Shallow Cross and Sam drops to the curl area, then throw the Dig route.
Post-Snap Reads vs. Man
1. Peek back-side for blitz off the edge (if Will was not a walker).
2. Read defender covering the Shallow Cross to determine man or zone coverage.
3. Listen for “Hot” from HB while reading Sam and Mac LB’s.
4. Throw Shallow Cross.
5. Throw Swing.
6. Throw Curl.
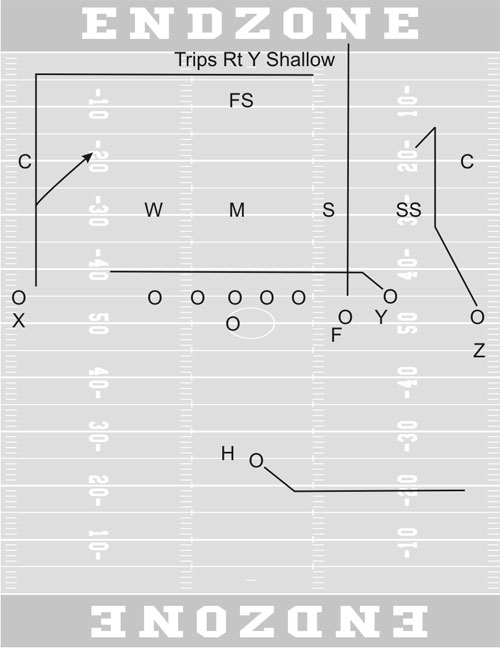
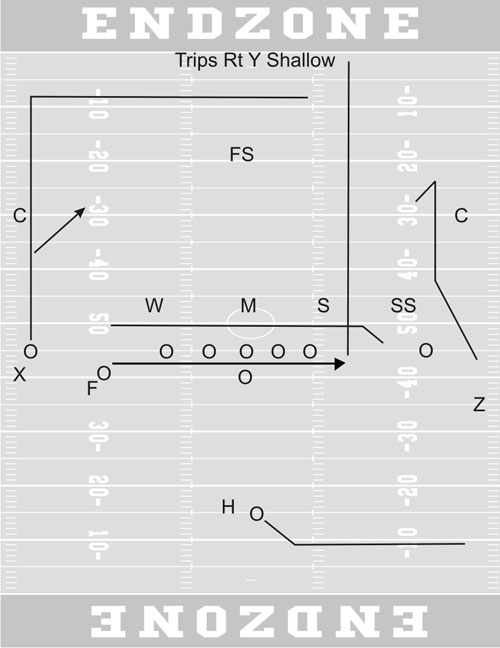
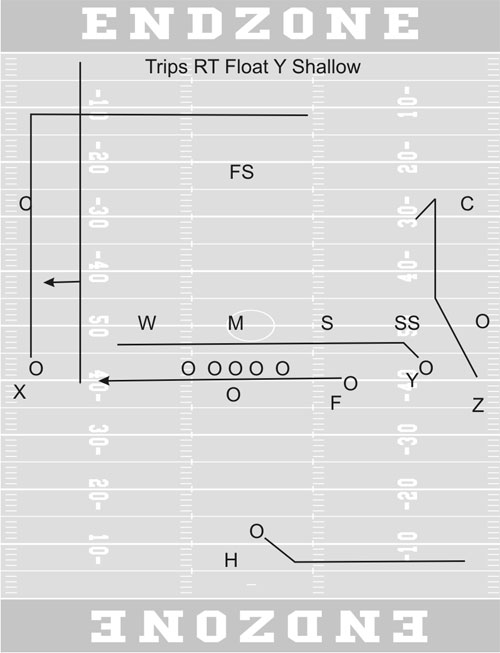
Shallow Cross from a 3×1 Set (Diagram 3/ Diagram 4)
*Slight rule adjustment to route
When we run “Shallow Cross” from a 3×1 set, our rules are very similar to that of a 2×2 set.
Rule #1 – The tagged WR runs the Shallow Cross route. We generally tag Shallow Cross to only the number one or number two WR to the Trips side.
Rule#2 – The number one or number two WR to the Trips side, who is not tagged, must run a Square In (#1 WR) or Curl (#2 WR) route.
Rule #3* – The number three WR to the Trips side must run a vertical and clear out the FS.
Rule #4 – The single back must swing to the WR running the Shallow Cross route, eyeballing the defender covering the Shallow Cross.
Rule #5* – If you are the furthest receiver from the Shallow Cross tag, then you run a Dig at fifteen yards.
Blitz Control in 3×1
Our blitz control in a 3×1 formation only changes to the single WR side. If we see a pre-snap walker or a post-snap edge blitz from Will, then our single WR sight adjusts his route from a Dig to a 3-step Slant route and anticipates the ball right away.
Motion from 2×2 to 3×1
(Diagram 5)
When we motion from a 2×2 to a 3×1, set all of our 3×1 rules apply. The motion man becomes the number three WR in the Trips and runs a Vertical route. The back-side number one WR must be ready to sight adjust from his Dig to a 3-step Slant for edge blitz control.
Motion from 3×1 to 2×2
(Diagram 6)
When we motion from a 3×1 to a 2×2 set all of our 2×2 rules apply. The motion man will move across the formation to the number two WR position landmark and must know if he is moving to the Shallow Cross side, or away from the Shallow Cross, and run the appropriate route.
Shallow Cross
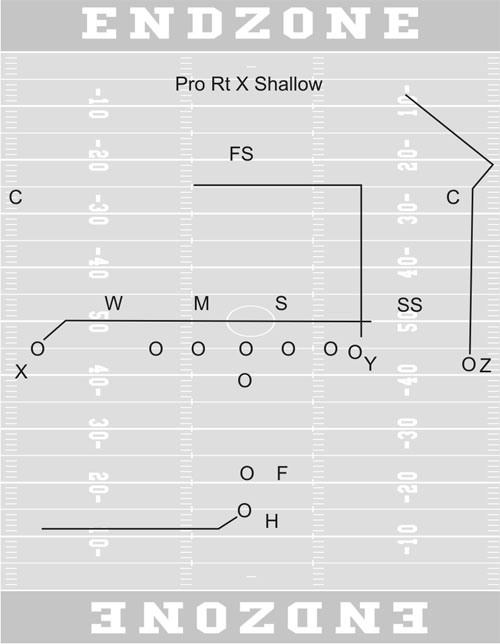
from a 2×1 Pro Set
(Diagram 7/ Diagram 8)
*Slight rule adjustment to route
The “Shallow Cross” from a 2×1 set is also a very good concept with a change to the TE’s route and to the back-side WR’s route.
Rule#1 – The tagged receiver must run the Shallow Cross route on the pre-snap heels of the Defensive Linemen looking for the ball immediately.
Rule #2 – The single back must swing to the Shallow Cross route, eyeballing the defender covering the Shallow Cross.
Rule #3*- The TE must read the Sam and Mac LB’s and run a ten to twelve yard Dig or Curl looking for green grass to settle into.
Rule #4*- The WR furthest from the Shallow Cross must run a Post route attempting to take the FS with him.
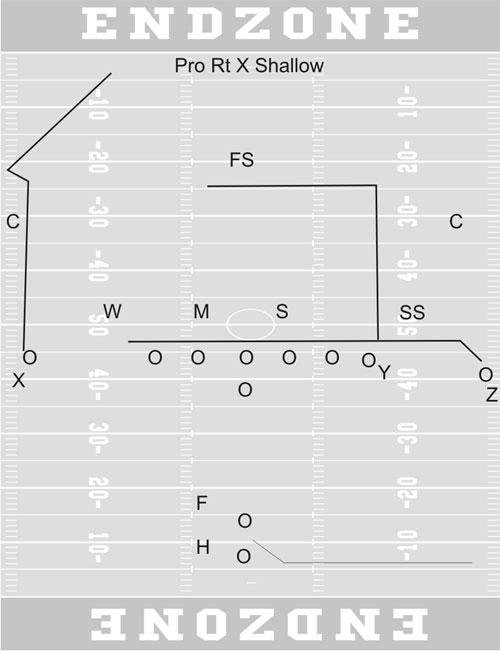
Blitz Control
from a 2×1 Pro Set
The HB must still call “Hot” if the flat defender to the Shallow Cross side blitzes, but we do not need to sight adjust our back-side Post route because our pass protection in the Pro formation allows us to protect against six rushers.
Conclusion
The Shallow Cross concept can be used from many formations, versus numerous coverages, in a variety of down and distance situations. The quicker that players grasp the WR rules for each set, the sooner your offense will become diverse and hopefully successful.u
About the Author:
Sean Lucas is a graduate of Eastern Illinois University (B.S.) and the University of St. Francis (M.S.). He just completed his eighth year coaching Quarterbacks at Providence Catholic High School and has spent the last two seasons coaching the varsity quarterbacks. Coach Lucas has coached on three state championship teams.

| Home | Magazine | Back Issues | Shopping | Subscribe | Contact Girdiron Strategies PO Box 14041 North Palm Beach, FL 33408 p. 561-355-5068 Copyright 2020, Gridiron Strategies a division of AFM Media, LLC. |