(GAP SCHEME)
POWER PLAY (GAP SCHEME)
by Chennis Berry
Offensive Coordinator and Offensive Line Coach Southern University
POWER PLAY (GAP SCHEME)
By Chennis Berry, Offensive Coordinator and Offensive Line Coach
Southern University
When we install the “Power” play, our goal is to implement this play with a physical mentality and make our players understand that this is a physical, downhill, double team, kick out, wall up type of play. I tend to call this play, “God’s Play”. If this play is installed and executed properly, it’s a play that you can hang your hat on. We first must get our players to believe in the play and want the play to be called. Being that this play is in the “GAP” scheme family, everyone must understand that they are responsible for “GAP INTEGRITY”. In the simplest form, the OL is responsible for:
TE: Play side “D/C” gap. (Depends on if the EMOL spills or boxes)
Pulling OG: Play side “C/D” gap. (Depends on if the EMOL spills or boxes)
PST: Play side “B” gap.
PSG: Play side “A” gap.
C: Back side “A” gap.
BST: Back side “B” gap. (Gap hinge)
BSTE: Back side “C” gap. (Gap hinge)
Coaching Point: If there is no defender in the assigned gap before the ball is snapped, you should strive to create a double team at the point of attack and aim for movement (Diagram 1)
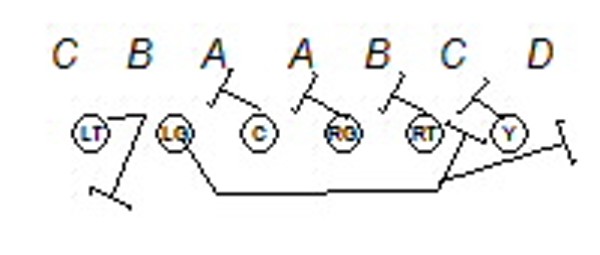
Diagram 1
The “Power” play consists of several factors in order to make the play work. The progression is as follows:
1. Down block
2. Double team
3. Kick out
4. Skip pull
5. Gap Hinge
6. Backfield operation
DOWN BLOCK
This block is used by offensive linemen to block a DLM that is aligned on an adjacent offensive lineman to his inside gap. You should aim to fit your NEAR shoulder under the defender’s FAR shoulder from the ball (Centers will use a Near to Near Fit), then LIFT. The two main objectives are to eliminate penetration and not to allow the defender to cross your face.
DEPARTURE ANGLE
1). First step is determined by two factors: How far away is the defender? How tight is the defender to the LOS?
2). The answer to these two questions will tell you how flat your first step will be. The further off of the ball, the more upfield your first step should be.
3). Your goal is to aim fit your NEAR shoulder from the ball up under the defender’s FAR shoulder from the ball. Your hat should aim to fit on the defender’s hip (Hat on back).
CONTACT
1).Versus a penetrator, roll him down inside using our NEAR to FAR fit and drive.
2).Punching the near elbow will help you collapse the defender. (Be alert for the DLM trying to fight back across the face of the OL. Then you should work UPFIELD vertically).
3). Work within the framework of the defenders body.
FOLLOW THROUGH
Once contact is made, finish through with your hands and hips (Diagram 2)
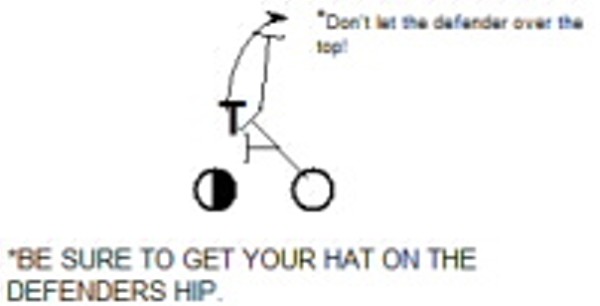
Diagram 2
DOUBLE TEAMS
Is the blocking scheme used on the play side by two adjacent offensive linemen where both linemen are responsible to get movement on the down linemen? Additionally, one blocker comes off to block a pursuing LB from the backside. MOVEMENT IS KEY!
COVERED (INSIDE) BLOCKER (Diagram 3)
* Your first step will be a “Lateral Lead” step with your inside foot. You move your inside foot laterally, then your outside leg will split the crotch of the defender.
* Aiming point is the defender’s inside number. You will strive to shoot your outside flipper though the defender’s inside number, then lift.
* Never get beat away from your help. Protect your inside gap.
*Four eyes remain on the LB you and your adjacent OL are working to.
* Work the inside half of the defender. As you feel the outside blocker going up to the second level defender, slide your headgear to the play side number.
* If the defender angles away, punch through the inside number and be alert for “Inside Gap Integrity.”
* Keep eyes inside to protect against “Run Through” defender to your inside gap.
* The goal should be to keep the inside arm FREE of the inside half of the double team. Pump it so that the Inside blocker doesn’t turn his shoulders to make it easier to get off on the run-throughs.
UNCOVERED (OUTSIDE) BLOCKER (Diagram 3)
* The technique used for the uncovered OL will be called a “Gallop Step”. You will take three to five gallop steps to time up with the inside OL. Your goal is to get your inside cheek touching the adjacent OL’s outside cheek.
* Your aiming point is to strike with a “Flipper” the defender’s outside number. Get a good fit, then lift.
* Four eyes remain on the LB you and your adjacent OL are working to.
* You will strive to get movement on the DLM and not come off the double team unless you get an “Over… Over” call by the adjacent inside blocker.
* The goal should be to keep the inside arm FREE of the inside half of the double team.
READS:
* Read the near hip of the DLM. IF:
Hip and headgear come to you – This is the toughest thing that can happen. Secure the inside hip of the outside half of the double team to achieve a “Cheek to Cheek” demeanor. Drive defender off of the LOS.
Hip and headgear go inside – Punch with inside arm to secure defender and level up to the second level for the LB.
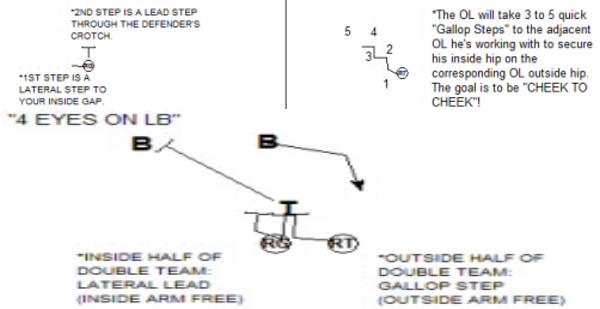
Diagram 3
KICK OUT/ LOG BLOCK
A very important factor of executing the “Power” play is the KICK OUT by the TE/H-back/FB. He must understand the “TRAIN WRECK” mentality. We strive to get the kick out to be a collision at the point of attack (POA). It must be an aggressive collision because he needs to “Clear the Read” for the pulling OG to determine if the pulling OG will pull inside (C gap) or outside (D gap). If the opponent that you’re facing is a “Spill” team, the likelihood that it will be an outside pull (D gap) is high as opposed to a “Box” team in which the pull may happen inside (C gap). Therefore, an aggressive “train wreck” kick out block is a must (Diagram 4).
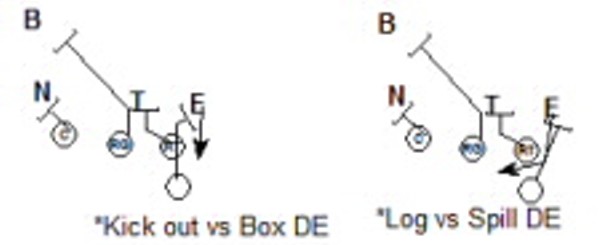
Diagram 4
SKIP/PULL
Second Level Pull (Skip): Puller will pull through the LOS aiming to work up to a second level defender. You will execute your “Skip” pulling technique where you will use a crossover technique (Diagram 5).
* First step will have you cross over with opposite foot.
* Second step you will get your feet and shoulders back square to the LOS.
* Third step you should be getting upfield to the second level.
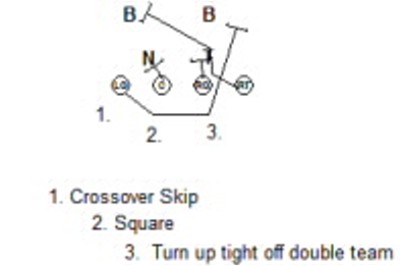
Diagram 5
GAP HINGE
We will execute a “GAP HINGE” block on the backside of the “Power” play. The backside OT will secure his front side “B” gap first to prevent backside “Run-throughs”. Once the backside “B” gap is secured, the backside OT will now flip his hips and “Hinge” drive block to the backside C gap defender (Diagram 6).
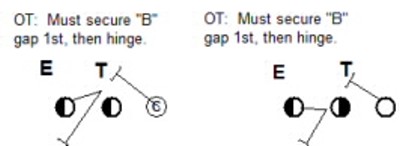
Diagram 6
BACKFIELD OPERATION
The effective operation of our backfield is an important ingredient to the success of this play. The QB’s goal is to not push the RB out of the “A” gap on his departure angle. The RB’s goal is to press the “A” gap first before he has a possible expansion. The goal of the RB is to never try and “CUT BACK” the power play.
QB: Under Center (Diagram 7)
· Secure Snap
· Reverse out (To hold MLB for a split second).
· Drive ball back as deep as possible to RB.
· Secure handoff to RB.
· Carry out fake to the call side.
Shotgun (Diagram 7)
· Depending on what side the RB is on, the QB will secure snap.
· Show draw action.
· Secure handoff to RB.
· Carry out fake to call side.
RB: Under Center (Diagram 8)
· Align at 7 to 7 ½ yards deep.
· Drop step, then press “A” gap.
· Start downhill, press play side A to B to C gaps (possible expansion).
· Don’t cut back!
RB: Shotgun (Diagram 8)
· Align 1 yard deeper than the QB offset to the right or left.
· Slide/Gather/Go to secure handoff from QB.
· Start downhill, press play side A to B to C gaps (possible expansion).
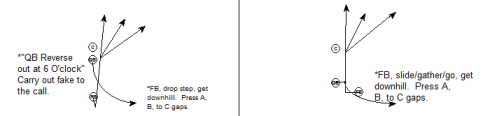
Diagram 7 Diagram 8
All in all, it starts with the installing of the “Power” play making the players understand that it’s an “ATTITUDE” play and if you execute all of the progressions to the play, this “Power” play will be sure to help you effectively run the football. Feel free to visit www.coachberryo-linedrills.com for more information on drills for your offensive linemen.
About the Author:
Chennis Berry was recently named offensive coordinator at Southern University and also serves as Assistant Head Coach and Offensive Line Coach. He previously was the Offensive Coordinator at Howard University. Berry played at Savannah State and began his coaching career there. He has also coached at Morris Brown College, Kentucky State, Fort Valley State, North Carolina A & T, and Morgan State.
Girdiron Strategies
P.O. Box 14007
North Palm Beach, FL 33407
1-800-527-4271 option 4