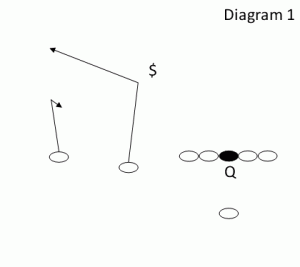
I’m certain that one constant of every coaches playbook is the “Smash” concept – the Hitch route by the outside WR and a corner route by the slot WR. It’s a great cover 2 beater and an easy read of the cornerback for your QB. It’s also usually an easy throw as well if the ball is in the middle of the field or on a hash and you’re working the boundary. Throwing the field (or wide side of the field) Corner route or Hitch route can be a difficult situation as it allows the defenders more time to break on the ball traveling across the field. For this most basic “Smash” concept, the outside Hitch route will break at approximately 6-7 yards with the WR sticking his outside foot in the ground and getting his head and hands around quickly. The Corner route will typically break at 10 yards, making sure the slot is running and leaning into the safety slightly before he breaks his route so as to hold that safety on the hash. Once the Corner route is broken off, the slot must run to “green grass”; That is, the deeper the cornerback is playing/dropping, the deeper the corner route/or skinny it will need to be. The QB reads the cornerback and takes a 5-step drop from under center or a 3-step from the Gun. (Diagram 1)
I will briefly describe the rest of the “Smash” variations below as there may be one or two that you haven’t thought of before and would like to try out:
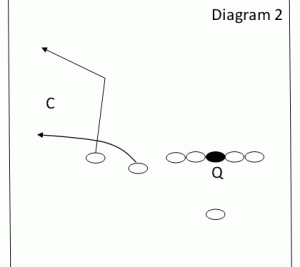
(Diagram 2) The outside WR runs the corner and the slot WR runs a 3-4 yard Arrow route. This is best run into the boundary. ,the outside WR will need to minus his split down to attack the deep half safety and create separation from the Arrow route. Into the boundary hides the splits of the WRs better.
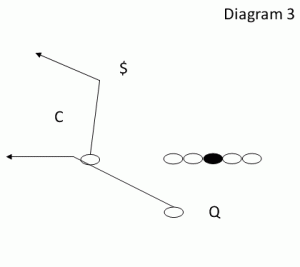
(Diagram 3) This is a 3 x 1 formation with the single width WR running the Corner route in the boundary and the RB running a Flat route. This is best done out of the Gun so as to allow the RB to offset and get wider, allowing him to get on the Flat route quick enough to threaten the cornerback.
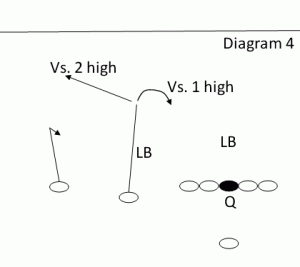
(Diagram 4) This is making the Corner route a “Read” by changing his route into a Curl if the coverage rotates to a Cover 3 look (1 High) finding the window between the LB’s.
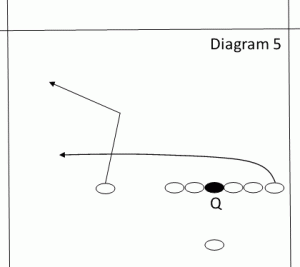
(Diagram 5) This is a 3 x 1 formation with the single width WR in the boundary running the Corner route and the #3 WR from the field running a Shallow route. The key to this look is to get that #3 over to the boundary quickly to threaten the flat and, in turn, the cornerback.
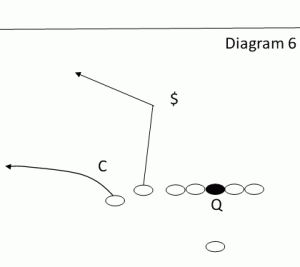
(Diagram 6) This is a squeezed or compressed formation with the outside WR running an Arrow route and the slot WR running a Corner route. This allows an easy throw to either side of the field as the WR’s on both sides are close enough to throw to and the defenders are all compressed down as well.
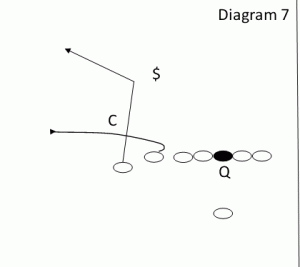
(Diagram 7) This example is the same as diagram 6 in terms of formation but switching the responsibility of the WR’s. This time the outside WR runs the Corner route while the slot WR takes a hesitation or jab step down, then gets on his Arrow route. This is unless you line the slot WR off the ball and then no hesitation step should be needed.
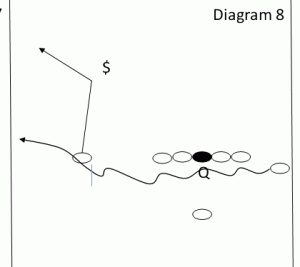
(Diagram 8) This is a 3 x 1 formation with a motion. The best way to run this look is by allowing the motion man to run the Arrow route because he will already be moving in that direction as he runs across the formation. The ball is snapped just before he gets to the boundary WR and creates a slight “rub” or “pick”. The single width WR in the boundary will run the Corner route.
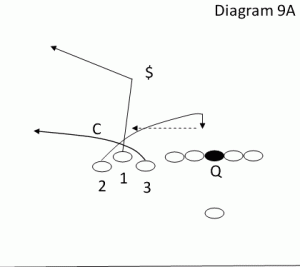
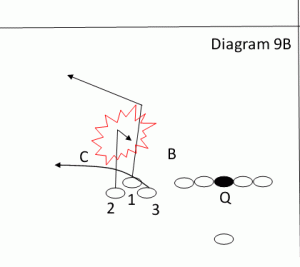
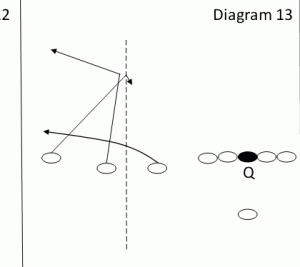
(Diagram 9A) This is running out of a “Bunch” formation. The #2 WR runs the Corner route and comes off the ball first. The #1, or the most outside WR comes off the ball. The 2nd and runs a Whip route. He starts on a 5-yard shallow course and hooks up over the “A” gap if the LB’s drop out or crossing the near LB’s face to get his hips turned. He then returns flat to the outside if that LB sits. The #3, or most inside WR, comes off the ball 3rd and runs an Arrow route. This mesh takes a little time to coordinate for timing purposes. (Diagram 9B) Red Zone Bunch, (+10 to +6 yard line) Hide Concept. #2 runs a Corner route, #3 runs the Arrow route, and the #1 runs a hitch to just past the goal line (See the wider version of this on Diagram 13 – Seek concept). The QB is looking to throw the hitch first, then works to the Smash Concept second.
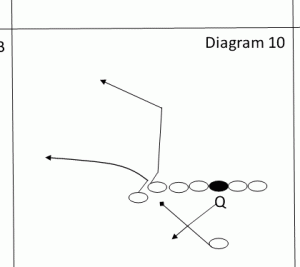
(Diagram 10) This is front side Play-Action Smash. This typically works best with a “Wing” look into the boundary. The QB sells outside zone action to the Wing side from under center. Both the TE and the H-Back or FB take a quick jab step toward the defenders they would usually be blocking on the outside zone then they get on their routes. H-Back or FB runs the Arrow route and the TE runs the Corner route.
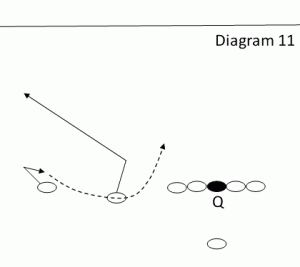
(Diagram 11) This is a red zone, (+8 yard line to the +3 yard line) 3-step smash. The outside WR takes 3 quick steps upfield and slightly to the outside, then hooks up to occupy the cornerback (they will probably be in man coverage). The slot WR takes 3 steps slightly in to hold the defender, manning him up, then breaking for the back corner of the End Zone. NOTE: If it is in fact man coverage, the outside WR may, upon hooking up his route arc back inside, as if it is an outside WR screen to pull that cornerback out and away from the slot WR.
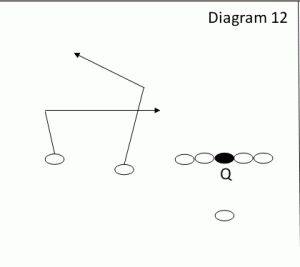
(Diagram 12) this is Smash vs. cover 2, man under. The outside WR runs his standard hitch, but upon recognizing that it is cover 2 Man, he is allowed to break flat as if he is now running a Shallow route to pull that cornerback in and away from the Corner route.
(Diagram 13) This is running a Smash concept to the front side of a 3 x 1 formation (Seek Concept). The #2 WR runs the Corner route, the #3 or most inside WR runs the Arrow route, and the #1 or most outside WR, runs a Direct route to a landmark 10 yards deep on the near hash and hooking it up. The reads change slightly here as the QB is looking for the #1 WR in the window first, then working to his Smash concept if that route isn’t open. The thought here is that the Corner route will pull out the OLB and occupy the near safety. The #3 or Arrow route will widen the corner back out and create a window for the #1 WR on the hash.
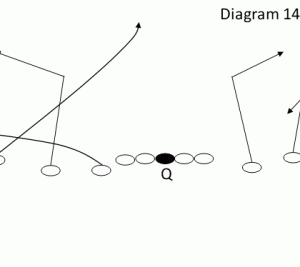
(Diagram 14) This is he Empty, Seek/Smash or “Pipe” Concept. This is usually used after the Seek has been used a few times and the defense starts getting comfortable with that look and is staying 2-high with their safeties. The #1 WR to the field will now start on his usual Seek course but will continue upfield splitting the safeties. The backside WR’s will run smash to hold the backside safety.
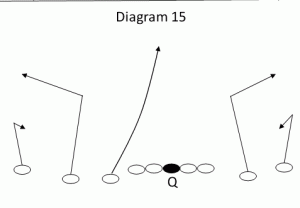
(Diagram 15) This is the Empty, Double Smash with the #3 or most Inside WR to the field running the “Pipe” route splitting the safeties. The Corner routes on both sides of the field should occupy and hold the safeties.
